If you’re serious about making money online, at some point you may well consider developing your own WordPress website. The problem is, when you’re ready to go for it, the last thing you want is for visitors to see what you’re doing when you’re in the actual process of setting it up.
In this post I’ll show you how easy it is to use staging to keep your ‘work in progress’ hidden, so when they do find you, they keep coming back for more!
Setting up a staging site for WordPress, or any other website platform, is something you may not have thought about but if you don’t want to lose visitors forever, it’s something you really shouldn’t overlook!
The thing is, if like most of us, you’re looking for ways to make a little extra cheeky money, at some point you’ll almost certainly be thinking about setting up your own website.
And why not?
It’s super easy these days, what with the likes of WordPress and other platforms where, even a complete beginner can create a professional looking site in no time, for zero cost and have it ‘live’ almost instantly!
What you might not have thought about though, is what any visitors may see, who come across your site when you’re in the actual process of designing it or adding content.
One thing’s for sure, when you’re just starting out and haven’t yet got any traffic, the last thing you want is to lose them forever if what they see appears to be broken, unfinished or simply not working properly!
This is where website staging comes in and in this post we’ll be discussing why it’s important, what it means and how you can use it to get your basic content exactly how you want it before any visitors get to see it!
A step by step guide: Setting up a staging site for WordPress
Because WordPress is so massively popular for beginners all over the world, we’re going to be mainly focusing on it here but the principles apply no matter what platform you choose to set up your site.
Building a WordPress website’s foundation!
Fundamentally there are three ways to create a WordPress website:
- Developing it live as you go
- Building it on a local environment on your own computer
- Creating it with a ‘staged’ development version of a live site
Let’s take a quick look at all three …
Developing it live as you go
Unless you’re someone who’s already experienced in creating websites, the chances are you’ll develop your first site through one of the online platforms which are designed to make the whole process an absolute doddle for beginners.
In fact many hosting providers have a facility where you can pretty much install a ‘live’ WordPress site at the touch of a button and then customise it simply by making changes in an ‘admin’ area, saving them and then checking to see how they look on the live front end.
The trouble with this approach is that every time you make a change and update it, because the site is actually available to view on the internet, if any visitors come across it during this development phase, they’ll see your ‘work in progress’ rather than the final content!
Building it in a local environment on your own computer
In general, this method is more often used by professionals or people who already have experience in developing websites.
While in some ways it has its advantages (… the development is completely secure for example and nothing can be made public accidentally), there are downsides to this as well.
For a start, building a WordPress site on your own computer requires a certain level of expertise in order to set everything up properly … expertise which most people don’t have!
However the main disadvantage is that a local development environment doesn’t replicate the exact conditions of a live website, which can lead to discrepancies between the local version and the live version later on!
Creating it with a ‘staged’ development version
The third way and in my opinion, the best way, is to build a fully editable replica of a live site, that’s also live, but hidden from the public.
This can then be ‘pushed’ to become the active site when any changes or the development has been done … a process known as staging!
So what exactly is website staging?
Put simply, it’s an exact copy of your live ‘active’ site, including the same files, databases, and configurations on a separate server or environment which can be used for testing and development, so you can ensure that everything is exactly how you want it before anyone gets to see it!
Now it goes without saying that having your own website gives you a major advantage if you’re looking to make some extra cheeky money online, but just having one out there, isn’t in itself enough!
A site that appears unfinished for example, or has errors or isn’t functioning properly, can lead to a poor user experience, resulting in lost customers, a damaged reputation and can even lead to technical issues that can harm your website’s performance and search engine rankings.
Which is why it’s crucial you make sure everything is working as it should be and any updates or changes you make are thoroughly tested before you let them be seen live.
But what if you don’t yet have a live website to stage?
For a new site this is an obvious problem but don’t worry there’s an easy fix.
Most platforms designed for beginners have a series of professional website templates for you to choose from when you’re starting out which show some very basic content.
In WordPress these are called ‘themes’ and there are literally thousands available, most of which are completely free!
All you have to do is select a template and create a front page (… basically point and click sort of stuff), then add a few words that say something along the lines of ‘Site Under Construction’ or ‘Coming Soon’, that sort of thing.
And this is what people will see if they ‘accidentally’ come across your WordPress website when you’re developing it.
Now, once you’ve done that it’s simply a matter of creating a staging site where you can make any changes and then experiment as much as you like without any visitors seeing what you’re working on!
Ok, how do you create a staging site for WordPress?
Here’s a brief step-by-step guide:
- Get yourself a hosting provider that offers website staging as a feature or has the ability to create a separate environment for it.
- Install WordPress or have the hosting provider do it for you if they offer this facility.
- Create an area in your hosting package specifically for the staging site.
- Make a copy of your live website, including all files, databases, and configurations and upload it to the new staging environment.
- Test the staged website to ensure that it’s an exact replica of the live site and that all links, forms, and functionality are working properly.
- Set up a method to easily switch between the live site and the staging environment, such as using a plugin or custom script.
- Configure any necessary redirects, such as testing forms or checkout pages to make sure they’re pointing to the staging environment rather than the live environment.
- Test the website again to ensure that all changes made on the staging environment are working properly before pushing them to the live website.
- Regularly update and maintain the staging environment to make sure it’s always in sync with the live website.
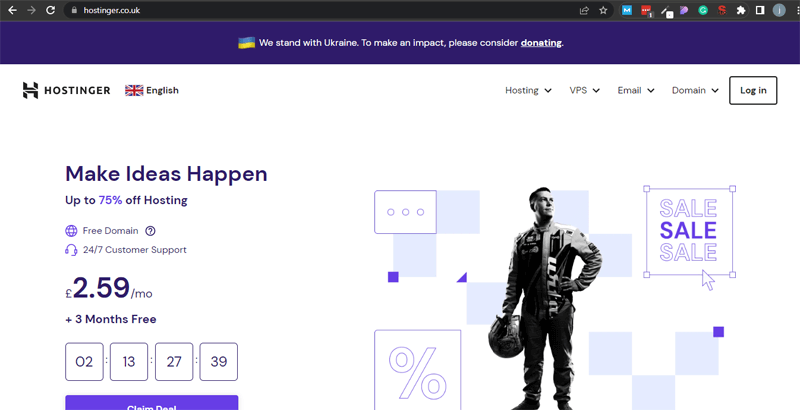
OR… DO IT THE EASY WAY IN A COUPLE OF CLICKS WITH HOSTINGER!
Now before I go on I should point out that when I set out to write this post, it was never meant to be an out and out promotion for Hostinger (or any other hosting platform for that matter).
However, at the time of writing this post, this site is hosted with Hostinger and I’m amazed at just how good it is and how much you get for a ridiculously cheap price so if you’re in the market for an extremely cost effective hosting provider with excellent service, facilities and back-up, then I couldn’t recommend it more.
For more information on Hostinger click here.
Ok, let’s get back on track.
Having developed a number of websites in the past I always used a localhost development environment on my home computer, which on the whole was fine but more often than not, I’d end up having to sort out various ‘issues’ when I was ready to go live!
But now I use Hostinger and staging, which gets rid of all the hassle!

Hostinger makes staging so easy it!
Literally with just a few clicks of my mouse I can create an identical replica of my main site and be making changes in no time, without the fear of buggering it up!
This is how simple it is.
Step #1 – In the Hostinger dashboard click on ‘staging’ on the left hand menu then click the ‘Create staging’ button …

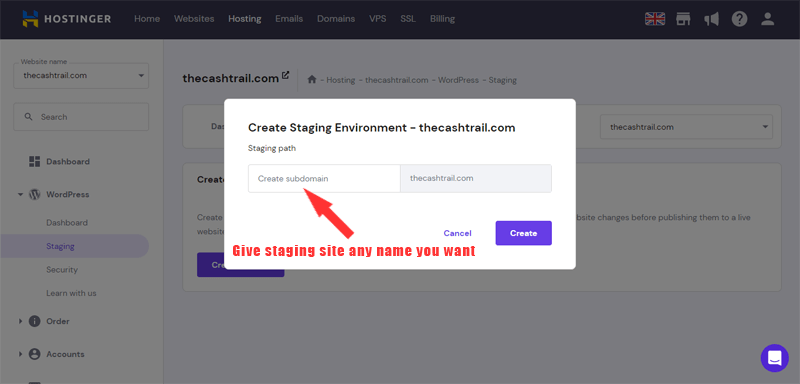
Step #2 – Give your staging site a name, it can be anything you like. For example, let’s call it ‘testsite’ …

Step #3 – Wait a short time for the staging site to be set up automatically (it can take up to 15 minutes but is usually much quicker).
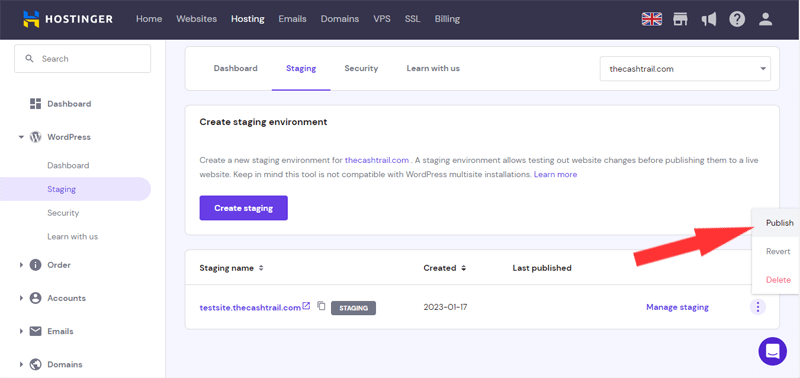
Once it’s done, click on ‘Manage staging’ and you’ll be taken to the WordPress admin area of your new staged domain where you can play around and experiment as much as you like.

Step #4 – Finally, when you’ve made any alterations you want and are happy with them, you can ‘push’ the staged site to make it the live site by clicking the three dots and then selecting ‘Publish’.
It’s that simple!

How a staging site for WordPress can improve design and development
The thing is, staging isn’t only used for when you’re starting out.
Once you’ve got your first site online, it’s really exciting and I can pretty much guarantee you’ll be hyper-keen to build and grow it!
And again, that’s the great thing about staging.
Even if you’ve already created a certain amount of content or done a lot to your site, once you’ve got a staging site set up for testing and development, it gives you really exciting opportunities to experiment with different design elements and features without the risk of breaking the main site.
I tell you, you’ll be amazed at how creative this can make you become knowing full well that your ‘main’ site is safe.
However, it’s not just about that.
Staging also means bugs and errors can be identified and fixed before they’re made public, which reduces the need for trouble shooting or post-launch maintenance or revisions.
This in turn means you’ll have a more polished and functional website that meets the needs of both you and your visitors…
… and that friends can ultimately lead to more profit!!
How a staging site for WordPress can help SEO and eCommerce
Another thing you may not beware of is how WordPress staging can also play a critical role in improving a site’s search engine optimization (SEO) and eCommerce functionality.
When you think about it, changing a live website can negatively affect any search engine rankings if it’s been indexed by Google or other search engines already, which can cause a loss of traffic and potential customers.
Needless to say, when you can test and fine-tune alterations on the replica website before being implemented on the live version, you can obviously minimise the risk of negative impact on SEO.
As for for eCommerce sites, website staging provides a safe environment to test new features, such as different payment options, checkout flows and other functionalities that can affect the user’s experience and conversion rates.
WordPress staging for mobile testing!
Currently it’s estimated that around 51% of all internet traffic comes from mobile devices so obviously you’re going to want to make sure your website is fully optimised for these, as well as any desktop computer.
This is so important but so often overlooked by new website creators!
However, when you set up a staging site for WordPress you can so easily test everything to see how it all functions on various mobile devices without the risk of development errors being viewed accidentally!
Obviously because your staged site is still live, even though it’s hidden, it means you can actually see how everything appears ‘in the real world’ on different mobile devices and browsers before it gets pushed to your live main site.
Naturally this allows you to identify and fix any issues that may not be visible on a desktop browser, such as layout and design issues, broken links, or compatibility issues with certain mobile devices.
So to summarise here are the main benefits of building a staging site for WordPress
Website staging is the process of creating a replica of a live website on a separate server or environment for testing and development purposes. Here are the benefits:
- Ensuring your website is working properly, looks how you want it and is free of errors before it goes live, providing a smooth user experience for your visitors.
- Allowing you to test and make changes without affecting the live site, providing a greater level of control over your website’s functionality and appearance.
- Identifying and fixing bugs or errors before they’re made public, minimising the risk of negative impact on user experience and website’s performance.
- Improving the website’s SEO and eCommerce functionality and testing the website’s performance on mobile devices.
Conclusion
The last thing you want is for visitors (who could ultimately end up as potential customers) to come across your unfinished site or see changes that you’re making when you’re half way through them and in my opinion the easiest way to make sure this doesn’t happen is to get familiar with staging.
Because the staging site is live but hidden, it enables you to test anything you do to it in a real world, live environment without having to worry about breaking your main site.
This means you can minimise the risk of errors and technical issues when you’re ready to implement any changes and ensure your site is fully optimised for mobile devices and search engines.
I hope this post has given you an understanding of how simple the whole process is and why it’s so important.

Who’s Jeff Cowtan? Copywriter, occasional blogger and fledgling YouTuber! As long as I can remember I felt if other people could be successful, why can’t I?! It’s why I love helping others with the same mindset as me to break away from convention and realise they don’t have to trade time for fixed amounts of money, in order to get where they want to be!

