Ok I’m going to kick this off with a big fat yes!
Reviews are meant to be unbiased but I think you get the gist already … I love it!
However I’m still going to try and be balanced in this post so will give the pros and cons (… in my opinion) of this great bit of software that anyone can use to develop professional quality visual materials quickly and easily … even if you’re a total beginner!
Let’s get into it …
What exactly is Canva?
Anyone who’s into making a little cheeky money both off and online, at some point is going to require some kind of visual media in order to get their ideas across to their target audience.
Well Canva is essentially an extremely user friendly graphic design application (… with both free and paid for versions) that’s perfect for just about anyone to produce exciting visual materials without ever needing any major graphic design skills.
What’s great is the range of templates that are available, all of which are fully customisable along with a massive library of royalty free images you can use to make your content stand out.

How does it work?
Canva is an application that you can use online directly in your web browser or download to your computer or smartphone.
Once you’ve got access, there are essentially four fundamental steps that help you create exciting designs for all kinds of digital and printed media:
Step 1# – Choose from a vast library of templates
Whether you’re looking to produce website pages, Instagram videos, YouTube shorts, social media ads, thumbnails, posters, whatever, there are a huge number of predesigned and fully customisable templates for you to choose from.
Step 2# – Select ‘elements’ for your design
Even with the free version there are literally thousands, if not hundreds of thousands of royalty free photos, videos and graphics that you can easily add to your Canva projects. Use them in any way you want in order to make your content unique.
Step 3# – Enjoy the drag and drop editor
This is what makes creating your designs so easy because it allows you to change text, typefaces and colours and move selected elements around any template with ease. The editor also provides controls that enable you to create your own custom templates as well.
Step 4# – Export and use
Once you’re happy with your wonderful ‘creation’, simply export it to use in any way you want.
But is it easy?
Absolutely!
Unlike Photoshop or some of the other professional graphic design programmes, learning to use Canva is literally a piece of cake (… ok not literally but you know what I mean)!
There are plenty of free video tutorials and courses available within the app itself which are really easy to follow and because of the ever increasing popularity of the platform, you can also find tons of tutorials on YouTube in the highly unlikely event you can’t find an included ‘lesson’ on what you need!
The Canva interface
Creating professional looking designs in Canva is all really intuitive because of the way the tools are laid out but it’s the super-easy drag and drop editor that makes using this platform an absolute dream!
You can either begin with a blank page or select one of thousands of the available templates but once you start working with your selection, you’ll see what I mean!
In fact you can change as little or as much of a template or design as you want, be it colours, fonts, backgrounds, images etc, it’s all an absolute doddle and adding text, captions and loads of other stuff is just child’s play!
Moving it all around is the best bit though …
Simply click on whatever it is you need to reposition and really useful guides appear enabling you to move, resize, align, delete, whatever!
These guides are also brilliant for swapping out elements such as a photo or graphic, which can easily be replaced with a few clicks of your mouse.
Bottom line …
Whatever you need to do graphically, you should be able to do it with Canva, without any stress or hassle.
Let’s run through the basics to show you what’s involved.
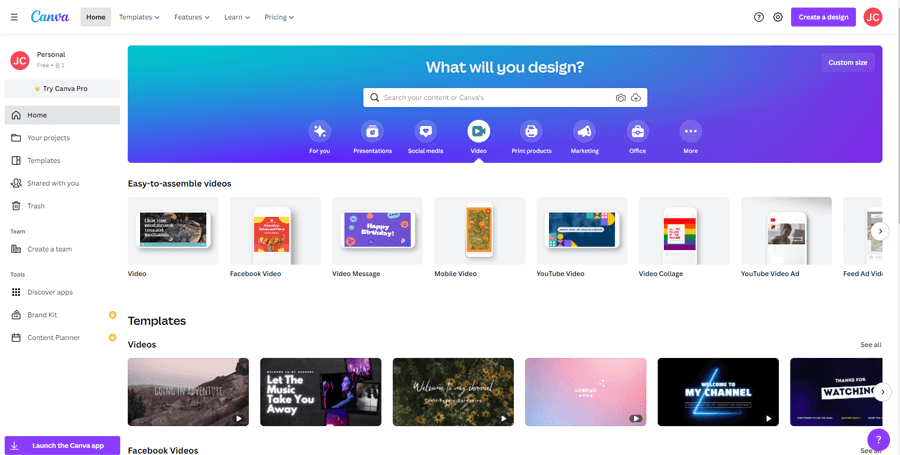
When you log on to Canva, the first page you come across looks like this …
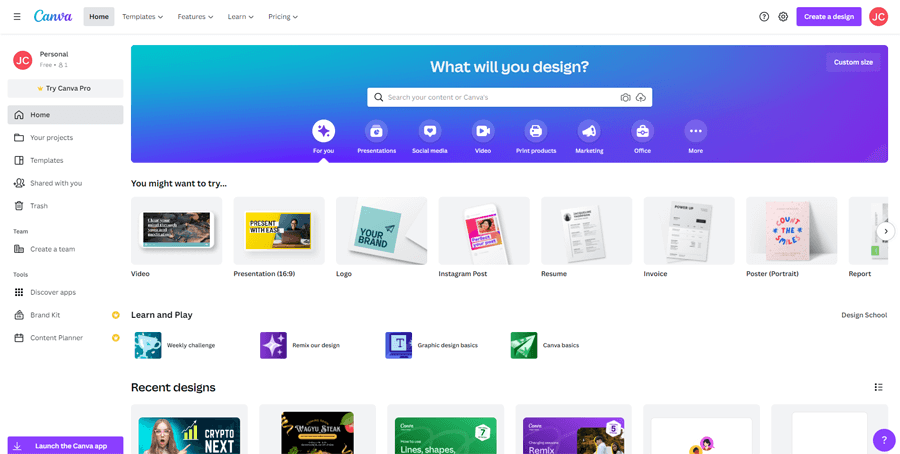
It’s actually really self-explanatory but if you’re not sure what to do, you’re prompted with a ‘What will you design?’ search bar!
Just type in your design idea or click the icons below this bar and you’re presented with a nice list of suggestions for the sort of layout you’ll most likely need.
Click any one of them and you’ll be directed straight to the drag and drop editor along with all the templates to choose from. Once you’ve made your choice, click on it and it automatically appears in the drag and drop window.
To edit, all you do is select any element you wish to change such as text, pictures, shapes, decoration etc and it becomes highlighted for you to adjust, delete or replace as necessary.
Here’s an example …
In order to replace the image, simply highlight it and then hit delete on your keyboard.
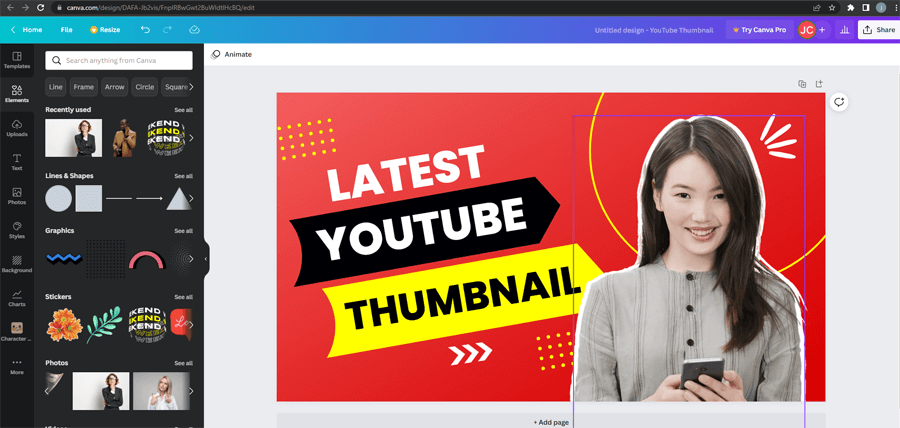
Then, select whichever element you want to replace it with from the menu on the left and it’ll automatically appear on the editor for you to drag around and adjust as necessary!
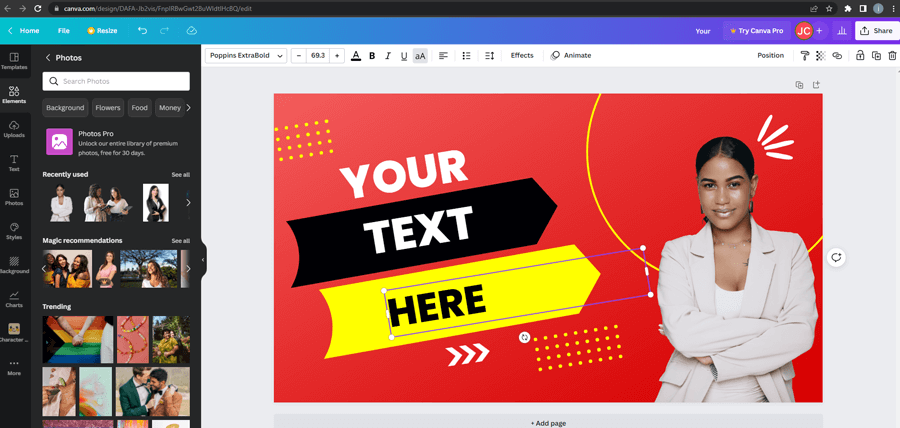
As far as changing or adding text is concerned … again, it’s a piece of cake.
Simply double click on the text that’s already there and a cursor appears which you can use to change it in anyway you want.
Or you can remove it altogether with a single click, where it becomes highlighted and you just delete it as normal.
To add text, click on the text menu icon on the left, select which type of text you want and as if by magic it just appears on the editor for you to adjust.
Adding your own elements
As if that wasn’t enough, although there’s an unbelievable choice of elements you can use in Canva (… theoretically more than you should ever need), it also lets you import your own media too.
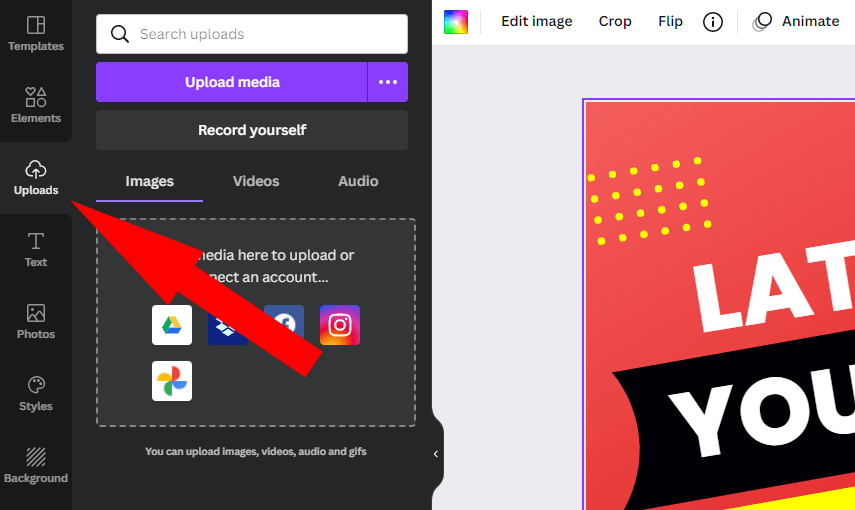
For example, if you want to swap a placeholder image with one of your own, you can easily upload the relevant image via the uploads menu icon on the left!
This uploads section lets you add your own photos, videos and even audio to your project and once imported, you can simply grab whatever it is from the tab (… image, video or audio) and drop it into the editor!
You can even edit photos!
Once you add a photo to your design, it can be adjusted really easily using Canva’s photo editing tool.
By clicking on your photo an ‘edit image’ button appears and you’ve guessed it … click this to do all your ‘tweaking’.
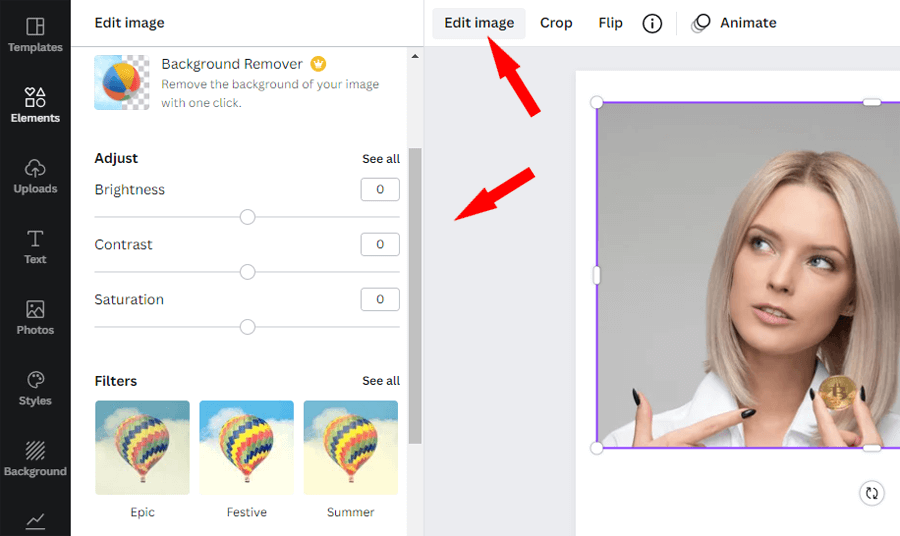
Now of course you don’t quite get the functionality of say Photoshop (… or the complexity) but you do get access to a number of essential controls that enable you to make adjustments to things like brightness, contrast and saturation.
You also get a number of filters that you can use including things like ‘pixelate’, ‘bad tv’ or even something called ‘Smartmockups’ which is particularly cool.
It enables you to make a mock up of the photo superimposed onto a mug, smartphone, laptop, book cover, business card or even a t-shirt which is brilliant for visualising ‘physical’ products if you’re looking to have them produced.

Shadows
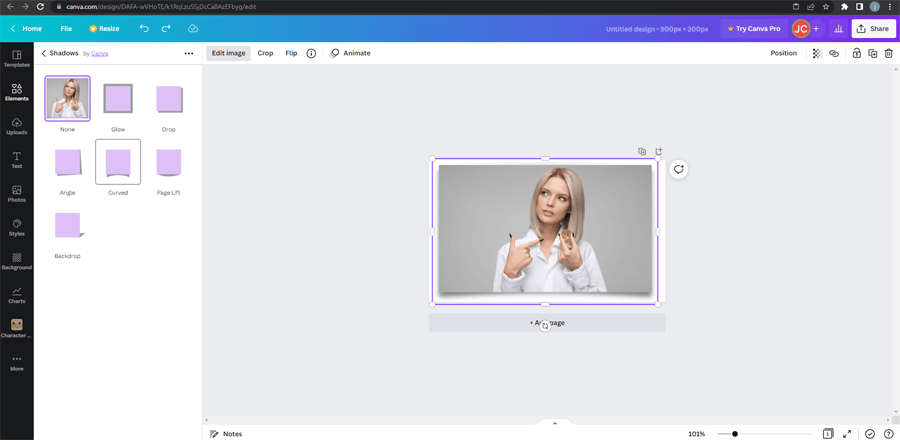
Another useful feature of Canva is a quick and easy way to add the classic ‘drop shadow’ which you’ll find on many website images to make them look more interesting.
In the past I’ve always done this with Photoshop which is pretty straightforward but if you want anything like a curved drop shadow (… so it looks like the edges are lifting from the page), it can be a bit of a faff.
Not with Canva though.
You simply select an image (… or upload one), add a drop shadow from a menu which is also accessed from the ‘edit image’ tab and ‘Bob’s your uncle’, a lovely drop shadow appears!

The thing is, if you’re a fully ‘paid up’ professional graphics person, you may find the controls used for editing in Canva somewhat limited, especially if you compare them to the likes of Photoshop etc.
But for the clear majority of users the tools are perfectly good for everything you’ll ever need in order to create really exciting media, especially if you use them with the thousands of templates that are included.
And what about videos?
Yep, Canva’s not just limited to the still stuff!
You can create great videos for YouTube, social media, Facebook ads, in fact all kinds of things and edit them as necessary for use on whichever medium you want.
For example, if you want to create a video specifically optimised for a smartphone, you can.
But if you want it to render properly on a desktop computer as well, that’s no problem.
It’s all pretty much done in the same way you’d develop static content – select a template or create your own, select videos from the huge library of stock videos or upload your own, edit and then export to whatever medium you want to use it for.
You can even record video directly into Canva using your webcam if you want to.
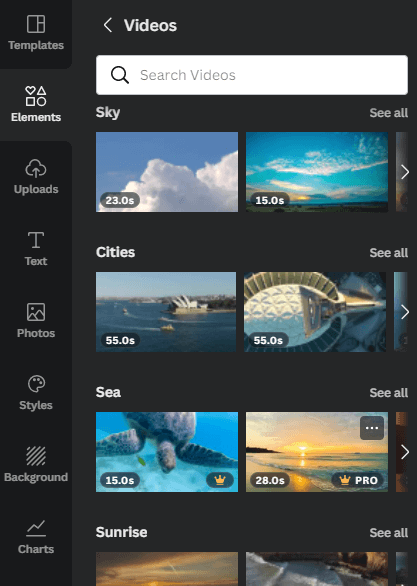
Once you’ve selected the video clips you want to use it’s then just a simple matter of dragging and dropping them onto a perfectly satisfactory timeline editor where you can edit them as necessary.
Of course you can upload your own audio files to add as well but there’s also a really impressive royalty-free library of music and sound effects which you can use instead.
Now it has to be said, the actual functionality of the timeline editor is extremely limited when you compare it to many other dedicated video editing applications.
For example there are only a handful of transitions you can use between clips and the ‘cutting’ facilities can only be described as basic at best.
However, it’s the huge library of stock videos and audio included which make Canva such an impressive tool for the majority of visual media creators!
Exporting and saving your projects
Once you’ve created your Canva project you can use it straight from the application itself by sharing it directly to your social media account such as Facebook, Instagram or Twitter or you can download and save it directly to your computer.
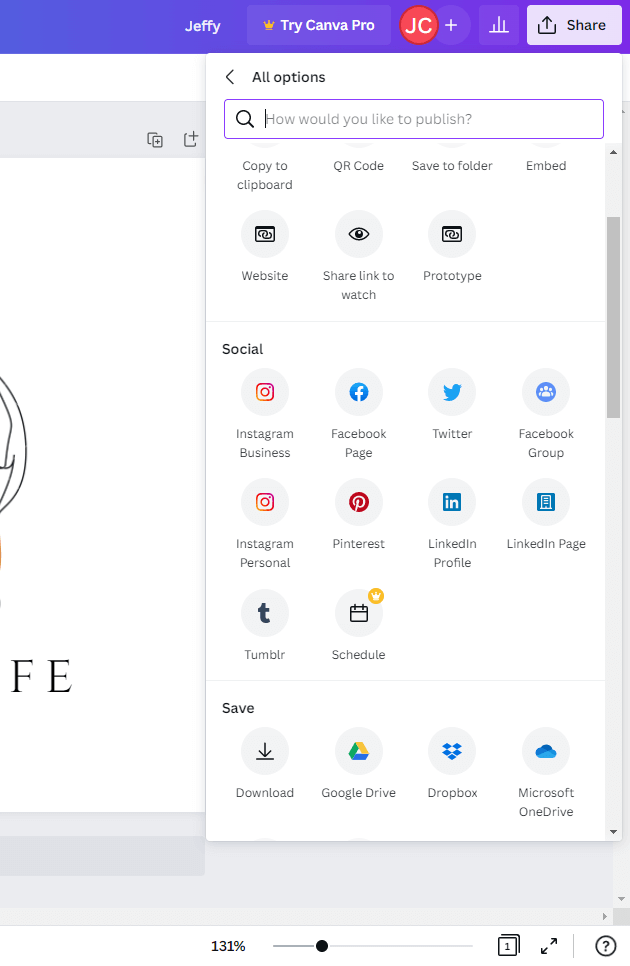
Now this is where there is a slight drawback using Canva …
Fundamentally the formats you can save your projects in are limited compared to other professional design applications but for the most part, those that are available are perfectly satisfactory for the majority of uses.
You can save in JPG, PNG, PDF Standard, PDF Print, SVG (… only in paid for version), MP4 Video, Gif and the platform even suggests the best format for you to make it even easier!
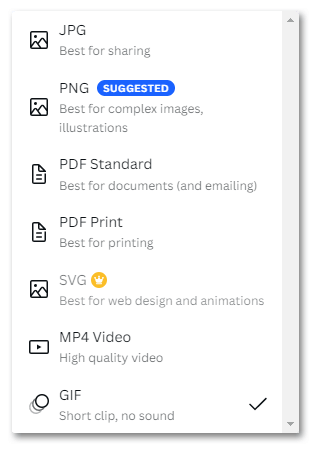
Bottom line, professional designers might well need a bit more but for the majority of people using this app, the exporting facilities are absolutely fine, especially if what you’re creating is to be used online.
Let’s talk Magic Resize!
So you’ve created a fantastic, vibrant banner for a blog post, you’re really proud of it and decide you want to use it on say Facebook, Instagram or any other social media platform.
Unfortunately different platforms use different sizing and aspect ratios for displaying their media so it’s not just simply a case of transferring your design across.
With Canva’s Magic resize tool (… not available on the free version unfortunately) it’s not a problem though because with a touch of a button your designs can literally be adapted for a whole range of different social media platforms.

By selecting which platforms you want to resize for from a drop down list, Canva does all the hard work for you, opening up new tabs in your browser for each one.
When you click on a tab the relevant canvas size for the platform chosen is preselected and displayed on the drag and drop editor with your design already included. If you need to modify it that’s easily done in the usual way.
There’s so much more!
What I’ve touched on in this review is just the tip of the iceberg.
There’s just so much more included, from ‘branding’ facilities to simple webpage creation to product catalogue imagery and so much more.
Canva for FREE!
Not only can you use Canva for free but the free version is incredibly powerful in its own right (… so powerful in fact, many users will never need anything else)!
As a free user you get access to literally thousands of graphics, images and templates and most of the tools you’ll ever need to produce really professional looking media although you don’t get access to premium templates, elements, photos, videos, templates etc which are only available if you upgrade to being a pro member!
That said, without doubt, the free pacakge is outstanding in what you can do with it!
Canva upgrade pricing plans
If you want access to all the features of Canva including all the premium options you can upgrade to the ‘Pro’ or ‘Enterprise’ versions.
At the time of writing this post, you can upgrade to Pro for just £10.99 a month (… although there is an option to pay annually for £99.99).
Obviously this gives you access to everything the free version has to offer but also all the premium stuff as well. On top of that the Pro version lets you share your project with up to 5 people who can use the platform as well so if you’re a small enterprise with a team collaberating on a particular job, this can be extremely useful!
Enterprise costs £24 a month per user with a minimum number of 25 users. Clearly this is aimed at larger organisations who need to work with bigger teams of people. Enterprise obviously includes everything that Pro has plus some additional ‘corporate’ type benefits!
Canva pricing
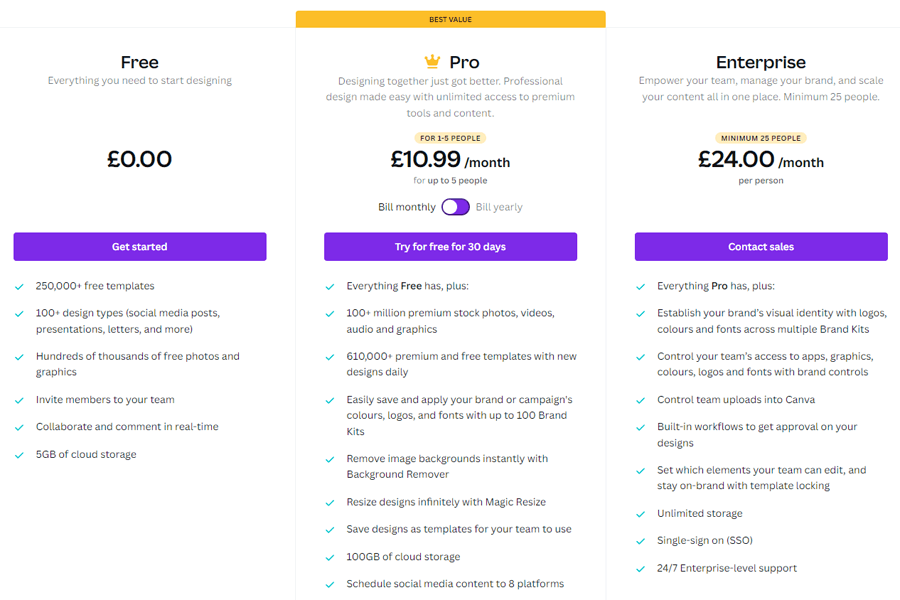
Here’s a brief overview of the differences between the three plans:
- Templates – You can help yourself to over 250,000 templates on the free plan and over 610,000 on both the paid for upgrades.
- Images and videos – According to Canva you can use hundreds of thousands of graphics and photos on the free plan and a limited number of videos, but over 100 million stock photos, videos and graphics on the Pro and Enterprise packages.
- Branding – Specific tools for this aren’t available on the free version but if you want to use your own branding, i.e. set colours, fonts, etc, there are tools on the paid for plans that make this super easy.
- Special tools – Although there’s a fantastic array of tools on the free plan, when you upgrade to Pro or Enterprise you get access to additional tools which are really useful. For example, the ability to export images with transparent backgrounds, background removal and of course the Magic resize tool among others!
- Storage – Even on the free Canva version you get a huge 5GB of cloud storage space for your projects but with the Pro upgrade that increases to 100 GB and unlimited for the Enterprise package.
- Number of users – The free plan is for a single user whereas Pro and Enterprise are aimed at teams of multiple users.
- Support – This is available on all plans but as you’d expect, on the paid for versions the response times and general service is inevitably going to be that much better!
The pros of using Canva
- The free version is incredibly powerful in its own right. Many users will never need anything more!
- There’s an incredible number of templates, graphics, photos, videos for use in your projects, with many thousands that won’t cost you a penny!
- It’s an ideal platform for creating pretty much any kind of visual media, even if you’re a total beginner.
- It’s easy to use with an intuitive ‘user-friendly’ interface which is especially useful for anyone without any graphic design skills or experience.
- It’s fantastic value. What could be better than free for an extremely powerful package? And even with the paid for versions you get so much for a relatively small monthly fee.
- Full support is available, even with the free plan!
- Design collaberation is easy with the multi-user aspects of the Pro and Enterprise packages.
- The ‘Magic Resize’ tool makes creating media for multiple platforms an absolute doddle.
- Canva can be used on mobile devices so you can even create visual media when you’re out and about!
- It’s also great for creating designs to be used on physical products, such as posters, flyers, leaflets, mugs, T-shirts, business cards etc.
And the cons
- The free version is absolutely brilliant but the best features such as additional templates, graphics and images require the paid for versions.
- Certain really useful tools such as Magic Resize, background removal or the ability to export with transparent background are only available in the paid for versions.
- The options are limited for professional designers.
- You can only export your media in the most common formats. For example you can’t export in ‘psd’ format if you wanted to develop your design further with Photoshop!
Canva conclusion
As I said at the start of this post, I love Canva.
For something that offers so much power for free, what’s there not to like?
After all, you can’t really get any better value for money than free but even with the paid for versions, you get an awful lot for minimal cost!
In a nutshell, Canva is an extremely robust, highly user-friendly app that’s full of exciting features which make creating visual media super easy, especially for beginners or non graphic designers.
Of course it’s not designed to be a complete substitute for professional level graphic design software (… although professionals could easily use it and be happy with the results), but because of the massive range of templates, the quality of designs can easily be put out to a professional standard and obviously at a far lesser cost.
To be frank, the ‘Canva pros’ above say it all but even the cons aren’t really anything ‘to write home about’.
Even if you’ve never designed anything in your life, it’s a lot of fun just playing with it … why not sign up for a free Canva account today?

Who’s Jeff Cowtan? Copywriter, occasional blogger and fledgling YouTuber! As long as I can remember I felt if other people could be successful, why can’t I?! It’s why I love helping others with the same mindset as me to break away from convention and realise they don’t have to trade time for fixed amounts of money, in order to get where they want to be!

