One of the biggest hurdles facing new bloggers is to create content, articles or even a basic blog post quickly enough to make the whole process worthwhile.
Fortunately there are some fantastic tools that can really help you churn out a decent post or any written content in super quick time.
In this article I’ll be sharing with you how I use one of the most amazing free tools available to make this whole process so much easier.
But first you need a plan!
#1 Allow yourself about 15 minutes for research
Obviously, when creating blog posts or articles, whatever your motivation for writing them, the key factor is to make them get read, so it’s essential that they’re not only interesting to your target audience but they’re also engaging.
One of the best ways to do this is to see what ‘the competition’ is saying about the subject you’re going to be writing about.
A simple Google search will show up plenty of examples and usually just browsing through the first two or three will give you enough of an idea about what’s going to be popular.
It’s then simply a matter of writing down the ideas that ‘appeal’ to you because very often, if certain articles ‘tweak’ your interest AND they’re ranked highly in the search engines, there’s a very good chance that it’s these ideas that people are looking for information about!
A quick word of caution here…
It might be very tempting to copy and paste the whole article but this is something you must NEVER do because putting out content that someone else has written (… especially without their permission) and plagiarism is the quickest way to get you blacklisted from the search engines.
However, there’s nothing wrong with copying and pasting the article if you’re going to use it as a very loose template for what you’re going to write yourself and then literally rewriting absolutely everything on it!
The whole idea is to create unique content so that the search engines and your readers get ‘different’ information that they’re not getting from elsewhere.
Once you have a feel for what you’re going to be writing about it’s time to move on to the next part which is creating an outline.
#2 Write down subheadings before the magic begins!
The next part is to simply create ‘the bones’ of your whole blog post.
The easiest way to do this is to write down a list of subheadings for all the sections that you’re going to discuss in your post.
For example, when I wrote this article, my list of subheadings looked like this…
- Introduction
- Allow 15 minutes for research
- Write down subheadings
- Time for the magic – open Google Docs
- Talk about each subheading
- Go back and edit
- Insert keywords, images and links
- Conclusion
Don’t worry about them being perfect just yet, it’s important to just get ‘the skeleton’ of the post down. You can polish these headings up a little later.
#3 Now it’s time for the magic – open up Google Docs
This is where it gets exciting.
If you haven’t got one already you will need a Google account which is free to set up and then you can access an amazing free resource called Google Docs.
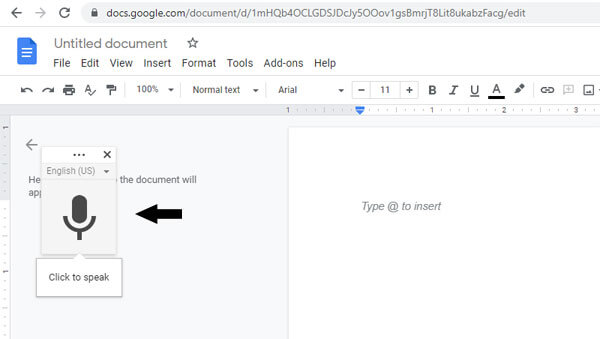
This program has many great uses but one in particular which is seriously useful for blogging is a tool called ‘voice typing’.
It’s so cool because you can literally speak about your subject and voice typing will turn your words into text!
To access voice typing you simply click the ‘apps’ icon on your browser… then the docs icon… which in turn opens up a page from which you can select a new blank document.

Then click on tools… followed by voice typing from the drop down menu…

The next step is to type your subheadings into the document (… or copy and paste them if you’ve already typed them elsewhere) and you’re then ready to start turning your spoken words into text!
#4 Talk about each sub heading
It’s time to fill in your blog post with content!
The first thing to do is click on the document to place the cursor where you want your type to begin and then click the ‘click to speak’ button.
Next, yes, you’ve guessed it… start talking!
Simply discuss the subject of each subheading with information you know about already or what you’ve recently learned from other blog posts and watch in delight as voice typing writes it all down for you!
After you’ve finished talking about each subheading you can click the click to speak button again to stop the voice typing while you place your cursor under the next subheading.
Repeat the process for each subheading.
The important thing to know here is NOT to try and make any sense of it because the chances are, unless you’re seriously competent at speaking out loud, it’ll sound like absolute gobbledegook.
At this stage though it really doesn’t matter!
Don’t worry about ‘erms’ and ‘ahs’ as these get ignored by voice typing anyway, just simply talk about everything you want to get down in as simple and conversational tone as you can!
A quick tip here it to have a few practice goes first and then you’ll be amazed at how quickly you get used to it!
#5 Go back and edit
Once you’ve got all your words down and talked about everything on each of the subheadings, it’s now time to edit it all so it makes sense.
After you’ve done this a few times I guarantee you’ll be surprised at how quickly you can turn what seems like a mish mash of incomprehendable sentences into a coherent blog post that is exciting and engaging for your reader.
You’ll also be delighted when you see the time because you’ll realise something that used to take you days or perhaps even weeks to write, you’ve ‘knocked it out’ in about an hour!
#6 Add keywords, images and links!
The final stage is to just go back over it all and insert any images and affiliate links you intend to use. At this point you can also review and put in place any specific keywords you need for search engine optimisation.
By the way, although original content is always the ultimate goal when writing successful blog posts, ideally original images would be favourable too.
Unfortunately we’re not all budding David Baileys or Lord Snowdons, but there are plenty of great resources online where you can download both free and paid for pictures.
Here are a few excellent sites where you can genuinely get royalty free images that you can use in any way you want.
Conclusion
There we are, a delightfully simple way to get lots of words down in double-quick time!
Once you get over the initial ‘awkwardness’ of speaking out loud, using the Google Docs Voice Recorder can even be fun! Although I would recommend only using this tool in a quiet room where no-one can hear you because ‘self-consciousness’ can severely affect what you have to say!
Bottom line, try it …
Nothing ventured, nothing gained and you never know it might even surprise you how much more productive you become!

Who’s Jeff Cowtan? Copywriter, occasional blogger and fledgling YouTuber! As long as I can remember I felt if other people could be successful, why can’t I?! It’s why I love helping others with the same mindset as me to break away from convention and realise they don’t have to trade time for fixed amounts of money, in order to get where they want to be!